Guests feel frustrated when they can’t find the entrance or figure out the lockbox. That one moment affects everything. In this situation, as a host, you will get a message or a call- even if it is midnight and you are asleep.
If the guest can’t get a fast response from you here, that frustration comes up with reviews. Not because your place was bad, just because the arrival was stressful and they felt alone in it. But if you send before checking the instructions, it never happens.
At STR Assistance, we begin by auditing each host’s pre-check-in communication and consistently uncover delays, unclear instructions, and gaps that leave guests confused—often leading to negative reviews after checkout. We then rebuild the process using customized check-in templates developed through real A/B testing across 50+ hosts, identifying where guests face issues and resolving them step by step. As a result, hosts experience up to 85% fewer guest messages before arrival, smoother check-ins, and a clear improvement in overall guest satisfaction, with every template tailored to the property and guest needs.
Problems during check-in are normal—the real difference is how you handle them. Let’s show you exactly how to write check-in instructions that work. We will also share five ready-to-use templates you can copy and paste that we have already tested and used in our daily operations. It includes examples of self-check-in, lockbox, and in-person arrivals. At the end, you will get a free downloadable version at the end.
What Are Airbnb Check-In Instructions?
Airbnb check-in instructions are the detailed guidelines that you send to your guests before they arrive. It provides detailed, step-by-step instructions for guests to enter the property 48 hours before arrival. In simple terms, “Check-in instructions tell your guest how to get into your property.”
These are simple steps you send to your guest before they arrive. It’s a detailed guide that explains how to find the place and how to enter the property without confusion
An Airbnb check-in instructions template is a ready-made message you fill in once and send to every guest before arrival. Here, you share the address, the entry method, and the access code. Your guest follows the steps and walks right in. Guests see these instructions in three places.
- Inside the Airbnb app, under their trip details.
- In the direct messages you send them.
- And in your digital guidebook, if you have one.
Airbnb shows check-in details 48 hours before arrival automatically. Most hosts also send a personal message on top of that. That message is what guests actually open and read on the way there.
There are three check-in types that hosts can set or allow guests:
- Self-check-in: Your guest checks in without you. You give them a keypad code, a smart lock code, or a lockbox code. Nobody needs to show up. Most hosts use this today.
- In-person check-in: Here, you can send someone whom you can trust to receive the guest at the door. It can take more of your time, but some guests appreciate it.
- Check-in considerations: It covers the extra steps your property might need. A gate code. A building intercom. An elevator PIN. If your place has any of these, write them out clearly. Your guest should never have to guess.
Why Are Proper Check-In Instructions Important?
Providing clear check-in instructions helps guests arrive without confusion. These minimize late-night questions, save you valuable time, and help create a seamless first impression that ultimately leads to great reviews.
Guests can come a long way to stay and enjoy utility life or emergency work. If they can’t access your property, they may become frustrated. Think about your guest for a second. That one moment can ruin the whole first impression. But proper check-in instructions save your reputation. Here’s how:
- Reduces guest confusion: Guests know where to go, which entrance to use, and how to get in. They follow the steps and walk straight in. No calls, no stress, no waiting outside in the dark alone.
- Saves Time and Fewer Messages: Every “where do I park?” and “what is the door code?” text comes in at the worst time. Sometimes, like late at night or early morning. Write your instructions once, cover everything, and those messages stop. Your phone stays quiet.
- Improves Reviews: Arrival is the first thing guests experience. It sets the mood for the entire stay. When it goes smoothly, guests remember it. Many write about it directly in their review. A smooth check-in is one of the easiest ways to earn five stars without changing anything about your property. Check-in instruction is the fact here.
- Helps Avoid Negative Experiences: A guest arrives with no instructions. A small problem hits. Nobody answers. That feeling of being ignored grows throughout the whole stay. By checkout, it becomes a bad review. Not because your place was bad. Because they felt lost from the moment they arrived. Clear instructions stop this before it starts.
What to Include in Airbnb Check-In Instructions (Checklist)
Airbnb check-in instructions include the check-in time, the address with directions, the entry method, and the access codes. Also, parking details, building access, WiFi, a short house rules summary, and your contact number.
Most check-in problems don’t arise from the property. It happened because one small detail was missing from the instructions. We’ve seen guests get stuck outside over a single missing step. So don’t rely on memory, use this instruction instead:
- Check-In Time: Say exactly when guests can arrive. If you’re flexible with early or late check-in, mention it clearly. Guests really appreciate knowing this upfront.
- Property Location & Directions: Send the correct directions to your property. The address of the building and what the entrance looks like, as well as a local landmark. Consider what confused your previous guest, and include that. Also, add your Google Maps link too. Paste the direct link to your property location so guests can open it with one tap.
- Entry Method (Lockbox, Keypad, Smart Lock): Tell them the way they enter your property. (lockbox, a keypad, a smart lock, or a regular key?). Then explain how to use it. If it is a keypad, give the code and the exact steps to enter it. If it is a lockbox, tell them where it is located and how to open it. Early instruction reduces later hassle.
- Access Codes: Write the exact code. If your code changes between bookings, make it a habit to check this before every single message goes out.
- Parking Instructions: Give them a detailed plan of where to park and where not to. Street parking, garage, permit area, reserved spot- whatever it is, spell it out. Also, tell them where not to park. If no parking is available at the property, mention the nearest public parking. Mention the permit details if the area requires one. It will reduce the number of guest massages or phone calls.
- Building Access Details: Where they may need access in your building- Lobby intercom? Elevator? Give them access first, don’t assume guests will figure it out.
- Wifi Details: Guests want this the moment they walk in. Put the network name and password somewhere easy to spot in your message.
- House Rules Summary: Simply pick your two or three most important rules and write them in one line each. The full list can live in your guidebook.
- Host Contact Information: Provide accurate contact information. Update it if anything changes, so they can easily contact you.
How to Set Up Check-In Instructions on Airbnb?
To set up check-in instructions, first log in to Airbnb, then open your listing and click “Manage listing.”→ Find “Arrival guide” in your settings→ Pick your entry type. Fill in your details simply→ Schedule your message to send 48 hours before arrival→ Read it back once and fix anything unclear→ Done.
Most hosts think this is complicated. Let’s break down the setup process step by step:
- Step 1. Open your listing: First, log in to Airbnb and find the listing you want to work on. Then go to the “Manage listing,” click it, and you’re in.
- Step 2. Look for the arrival guide: Scroll through your listing settings until you see “Arrival guide” or “Check-in instructions.” That’s the section where your guest experience actually begins.
- Step 3. Choose how guests get in: Pick your entry type. Lockbox, keypad, smart lock, or you meeting them in person. Once you select one, Airbnb shows you exactly what to fill in next.
- Step 4. Write it in a Friendly Tone: Fill each section of instruction that you guide your friend through so that they don’t face any issues. Just tell them where to go and what to do when they get there.
- Step 5. Schedule your check-in message: Airbnb has a built-in tool that sends your message automatically before every arrival. Set it to go out 48 hours ahead. You just write it once and never think about it again.
- Step 6. Read it, Guest Perspective: Before you save anything, read your instructions pretending you’ve never seen the property. If you pause anywhere while reading, your guest will too. Fix those spots that stuck you while reading.
Airbnb Check-In Instructions Template (Copy & Paste)
Here are five effective templates that we use in our STR operations. Just copy and adjust the details that match your property. Keep the tone warm but clear, there you go.
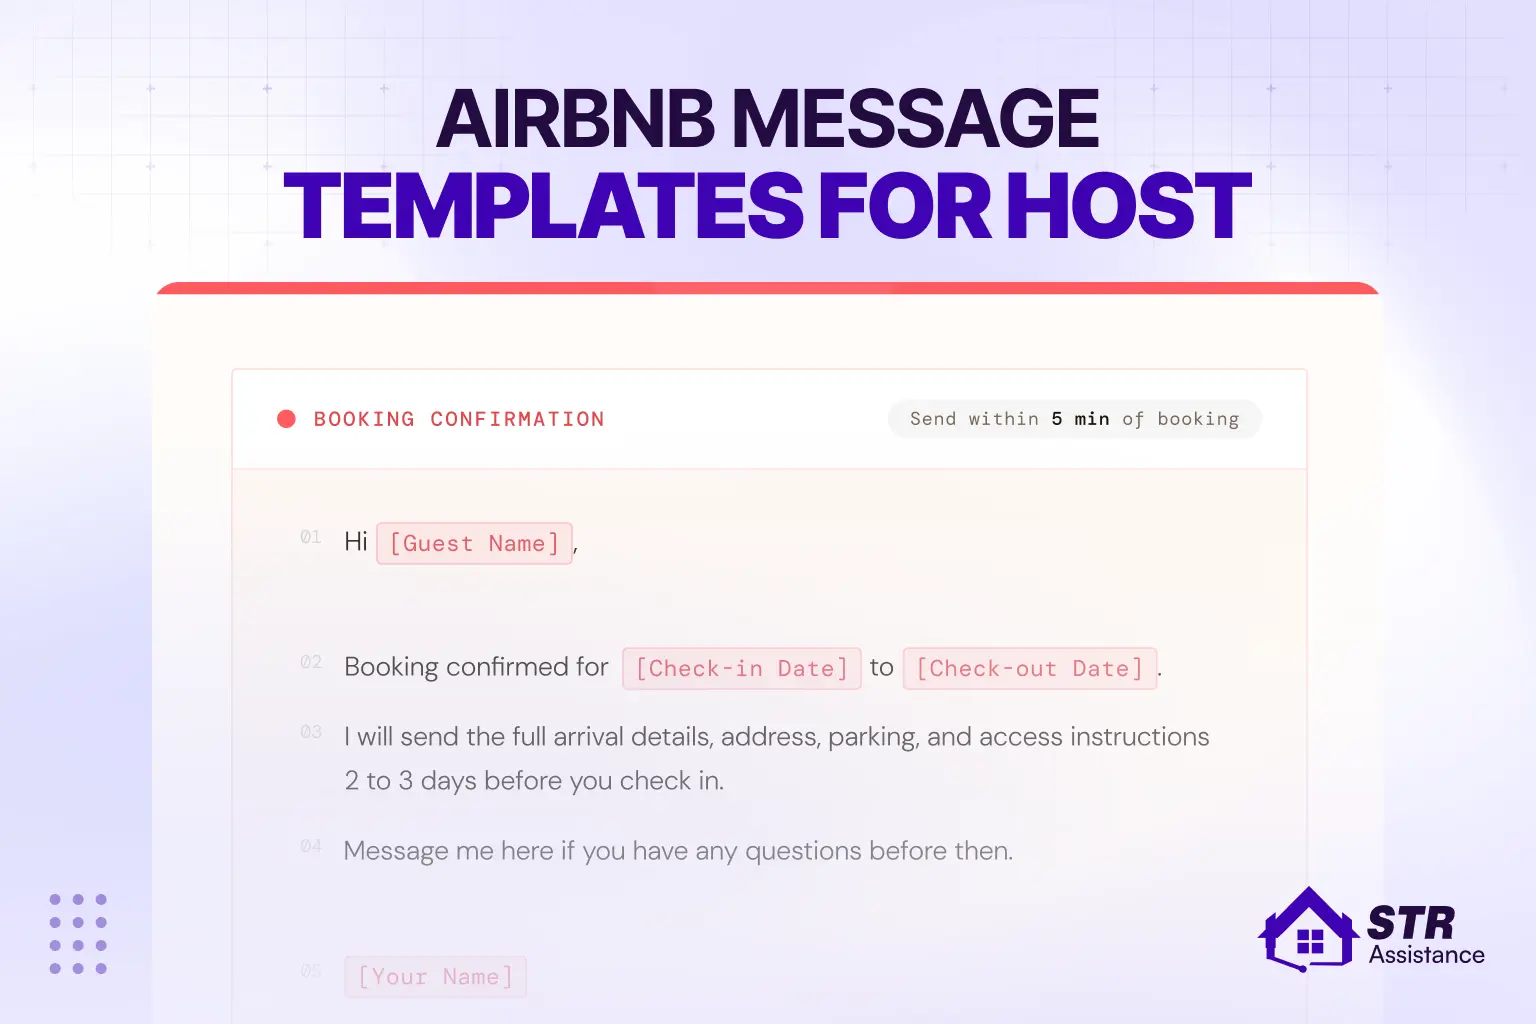
Template 1: Pre-Arrival Message (Sent at Booking)
Send this right after a booking is confirmed. Keep it short and welcoming, as we always do. It tells and shows the guest you’re prepared and that check-in will be easy. Here’s the Pre-Arrival Message Template you can just copy and adjust.
Hi [Guest Name],
Thanks for booking! We’re really glad to have you staying with us.
“Your check-in is confirmed for [Date] at any time after [Check-In Time].
A few days before your arrival, I’ll send you the full check-in details. Where includes everything, such as door code, parking instructions, and WiFi password.
If you have any questions before then, feel free to message me here. We want your stay to be as easy and comfortable as possible.
Moreover, you can find your full check-in instructions, door code, and other details in the guide below:
[Check-in Guide Link]
Looking forward to hosting you!
[Your Name]”
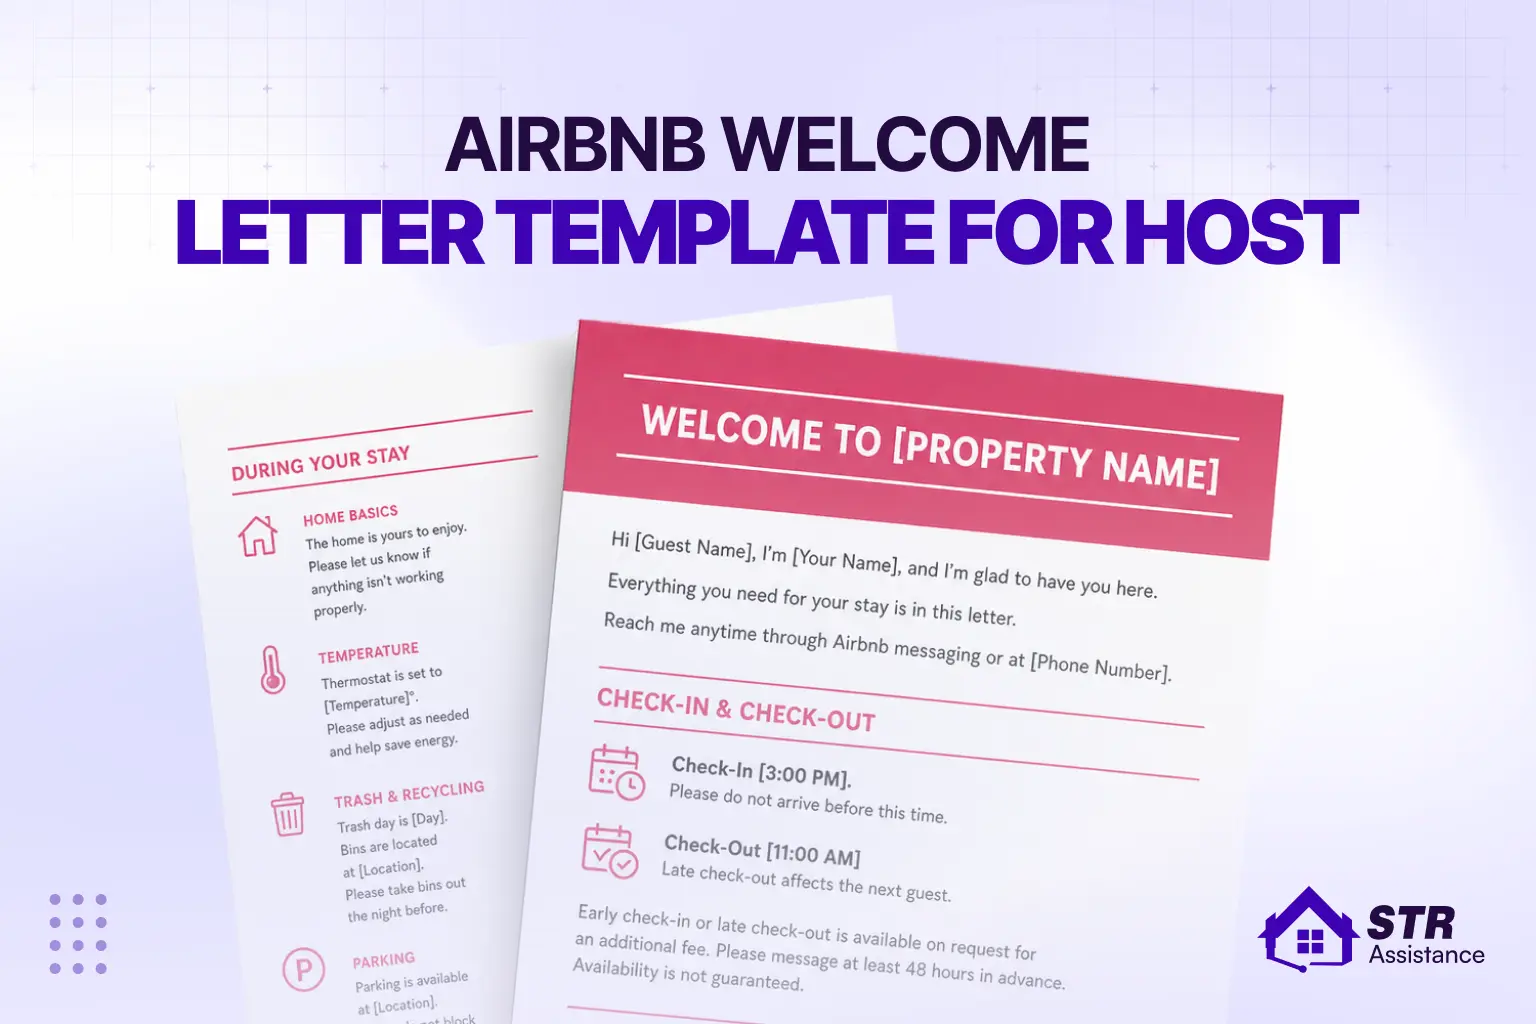
Template 2: Full Check-In Instructions (Sent 24–48 Hours Before Arrival)
This is your main check-in message. Send it the day before or two days before arrival. This is where you put everything the guest needs. Here’s our ussing full checking instruction: just copy – adjust – paste.
Hi [Guest Name],
You’re almost here! Here’s everything you need for a smooth arrival.
ADDRESS
[Full Property Address]
[Helpful landmark or direction – e.g., “It’s the red brick building right next to the CVS on Main Street.”]
CHECK-IN TIME
Anytime after [Check-In Time]. If you’re arriving early or need a late arrival, message me, and I’ll do my best to help.
HOW TO GET IN
Describe your own entry method. Example: “Walk to the side entrance on Oak Lane. You’ll see a lockbox on the wall to the right of the door. The code is 4821. Pull the door toward you, then turn the handle.”
PARKIN
Describe where to park. Example: “Free street parking is available on Oak Lane and Turner Ave. No permit needed. Guests also have one dedicated spot in the rear lot, look for the sign that says ‘Unit 4.'”
BUILDING ACCESS
If applicable: elevator code, lobby intercom, gate code, etc.
WIFI-
Network: [WiFi Name]
Password: [WiFi Password]
A FEW THINGS TO KEEP IN MIND
[Insert your 2-3 most important house rules – e.g., no shoes inside, quiet hours after 10 pm, no smoking.]
NEED HELP?
Text or call me at [Your Phone Number]. I’m usually available until [time]. If it’s an emergency after hours, [backup contact if any].
Can’t wait for you to arrive! Let me know when you’re in.
[Your Name]”
Template 3: Self Check-In Instructions (For Keypad/Lockbox Properties)
Use this when your property has a smart lock or lockbox, and the guest is letting themselves in. Be specific. Every step should be clear enough that the guest doesn’t need to re-read it. Copy the self-check-in instructions template from below, and use it as a professional:
Hi [Guest Name],
Self check-in is easy- here’s exactly how it works.
STEP 1- ARRIVE AT THE PROPERTY
Head to [Address]. Use the [front/side/back] entrance. [Add a clear landmark if helpful- “It’s the blue door facing the parking lot.”]
STEP 2- FIND THE [LOCKBOX / KEYPAD]
The [lockbox/keypad] is located [specific location- e.g., “mounted on the wall to the left of the front door, about waist height”].
STEP 3- ENTER THE CODE
Your code is: [ACCESS CODE]
[For lockbox: “Press the code, then pull the bottom of the lockbox open. The key is inside. Please return the key to the lockbox when you check out.”]
[For keypad: “Enter the code and wait for the green light. Then turn the handle and push the door open.”]
STEP 4- YOU’RE IN
Once inside, the main light switch is on your right. WiFi details are on the card on the kitchen counter.
WIFI-
Network: [WiFi Name]
Password: [WiFi Password]
CHECK-OUT is at [Check-Out Time]. Just make sure the door is locked behind you- the lockbox will secure automatically.
Any issues? Text me at [Phone Number]. I usually respond within minutes.
Enjoy your stay!
[Your Name]”
Template 4: In-Person Check-In Welcome Message
If either you or a co-host will meet the guest in person, send this out the day before. It confirms the meet-up and tells the guest what to expect. Here’s the in-person check-in welcome message template:
Hi [Guest Name],
Excited to meet you tomorrow! Here’s a quick heads-up for your arrival.
I’ll be at the property to greet you personally at [Check-In Time]. If your plans change and you need a different arrival time, just send me a message, and we’ll sort it out.
WHERE TO MEET ME
[Full Address]. I’ll be waiting near the [front entrance/lobby/parking area].
PARKING BEFORE YOU ARRIVE
[Parking instructions]
A quick note: Please text me when you’re about 15-20 minutes away so I’m ready for you. My number is [Phone Number].
I’ll walk you through the space when you arrive. It won’t take long, and I want to make sure you’re comfortable with everything before I leave.
See you tomorrow!
[Your Name]”
Template 5: Post-Check-In Follow-Up Message
Send this a few hours after the guest checks in. It’s a simple, friendly touch that catches small issues before they become complaints. See our ready-to-use Post-Check-In Follow-Up Template below:
Hi [Guest Name],
Just checking in- did you get settled in okay? I hope the check-in was smooth.
If you need anything at all, like extra towels, help with the appliances, or just have a question about the area, don’t hesitate to reach out to me.
My number is [Phone Number], and I’m also reachable through Airbnb messages.
Have a great stay!
[Your Name]
Examples Based on Different Check-In Types
As professional VAs, we understand that every good check-in type has a specific, easy-to-understand pattern. And these patterns we use all the time. Because we know vague instructions create confused guests. Specific instructions create smooth arrivals. Here are three common check-in types examples:
Self Check-In (Smart Lock Example)
“Walk to the main entrance on Maple Street. There is a Yale smart lock on the right side of the door. Enter code 7294 and wait for the blue light to flash. Then push the door inward. It will lock itself when you close it.”
In this example, the guest knows where to walk, what to look for, what to press, and what happens after. Nothing is left open.
Lockbox Check-In Example
“The lockbox is on the railing to the left of the porch steps. It is a small black box. Press 3-8-5-2 and squeeze the bottom to open it. Your house key and parking pass are inside. Put the key back in the lockbox when you check out.”
This is a simple, one-sentence, actionable example. The way the pattern is structured always works. Remember, guests read this on a phone while standing outside, so keep it that simple.
In-Person Check-In Example
“I will meet you out front at 3 PM. Look for the green gate. I will be just inside. Text me when you are about 15 minutes away. I will walk you through the place and hand you the keys when you arrive.”
Here, no long paragraphs are used. Just what the guest needs to know before they get there. Thats add.
Best Practices for Writing Airbnb Check-In Instructions
While we manage Airbnb listings for various hosts, we have seen that great reviews come from small things done right together. Check-in instructions are also among them and play a vital role here. So we always give them proper attention. Here’s the perfect way to write professional standard check-in instructions:
- Write Like You’re Texting A Friend: Drop the formal tone. Say “Walk to the blue door on your left” instead of “proceed to the designated entrance.” Simple words, short warm sentences. That’s it.
- Be Specific About Your Location: The address alone is never enough. Tell guests which entrance to use. Describe what the lockbox looks like. Mention the landmark next door. Guests often arrive somewhere they’ve never been before, sometimes at night.
- Send It At The Right Time: Keep your booking confirmation short and warm. Don’t add extra, add what is actually needed. Send the full check-in details 24 to 48 hours before arrival. Any earlier, and guests will forget everything before they even pack.
- Get The Length Right: Too short leaves guests guessing. Too long and they stop reading halfway. Cover what they need and stop there. Use short sections with clear labels so they can scan it quickly on a phone.
- Update Your Template When Something Comes Up: When a guest asks the same question twice, that question belongs in your instructions. The best templates we’ve seen were built over time, not written perfectly on day one.
- Always Include Your Contact Number: Even a solid message can’t cover every situation. Give guests a number they can text. A direct number feels more reassuring than Airbnb messages alone, especially late at night.
How to Automate Your Airbnb Check-In Messages
To automate your check-in process, you can use Airbnb’s built-in scheduled messaging tool. With Airbnb, you simply write your message once, set the timing, and it gets delivered automatically before every booking.
This is one of the most useful Airbnb tools for hosts, helping you stay consistent without manually sending messages every time.
But here’s the reality — writing the message is only half the job. The other half is making sure it reaches your guest at the right time, every single time.
And that’s where things often break down.
If you manage multiple listings, or you’re tired of replying to guest messages all day (and night), there’s a smarter way to handle it.
That’s where STR Assistance comes in.
We’re a dedicated short-term rental virtual assistant company working with Airbnb hosts, property managers, and rental owners who want their guest communication handled properly — without doing it themselves. Whether you need full support or an individual Airbnb virtual assistant, we tailor our service to match your exact needs.
Our team manages your check-in communication from start to finish:
- We write and schedule check-in messages for every booking
- We personalize each message with guest and booking details
- We send pre-arrival reminders, full check-in instructions, and follow-ups after check-in
- We handle guest questions so your phone stays quiet
- We instantly update your templates when anything changes (like door codes or parking instructions)
Avoid This Common Check-In Instruction Mistake as an Airbnb Host
Most check-in problems aren’t caused by bad properties. It was caused by one of these avoidable mistakes. After a long time, we realize that, and we don’t want you to make these same mistakes:
- Send instructions at the right time on Airbnb. Too early gets forgotten. Too late creates stress.
- Explain the entry clearly. Show where the lockbox or keypad is and how to use it.
- Always change the access code each time before a guest arrives.
- Avoid long messages and format. Instead, make sure guests can read it easily on a phone, and keep it that way.
- Make sure to provide clear parking instructions to prevent any confusion.
- Share a working phone number, not just Airbnb messages.
- Use the right message for each check-in type. Do not send the same one to everyone.
- Read your instructions like a first-time guest and fix anything unclear.
- Keep WiFi and entry details easy to find.
Free Downloadable Airbnb Check-In Template
Download Our Airbnb Check-In Instruction Templates (Canva, PDF, Docs)
We’ve tested and reviewed templates in our day-to-day short-term rental operations. After continuous refinement, we’ve narrowed them down to the ones we actually use every time.
- PDF Version
- Editable Google Doc
- Canva Template
All three formats are included. Use whichever works best for how you manage your listing.
We’ve put all of this together into a free, downloadable, and usable version of this check-in instruction. Designed for the Host who wants to save time, and also make a great first impression with their guests, clean, professional, and editable.
Bottom Lines
A smooth check-in experience starts long before your guest arrives. It begins with an easily understandable message, delivered at the optimal time, having all the information they need to come through your door without stress.
You don’t need to reinvent anything. Use the templates and adjust it to your property. Send them on schedule and then let the process do the work for you. If you want to go further automating your messages, managing guest communication across listings, or freeing up your time completely, STR Assistance is here for that, too.
Start with the templates. See how much smoother your check-ins get. Then build from there.